|
Title |
Description | Has new content | ||||||||||||||
|---|---|---|---|---|---|---|---|---|---|---|---|---|---|---|---|---|
| 50 Tips and Best Practices for Unity |
An informative document with good practice hints to solve and avoid Unity problems:
It's useful! vc
|
|||||||||||||||
| 6 981 MS-DOS free playable games from your browser |
You can play 6 981 MS-DOS games freely using only your browser. No download needed. Just hours and hours of fun. Paperboy 2? check! Wolfenstein 3D? check! Donkey Kong? check! Add more 6 978... checks. Just go to the Software Library: MS-DOS Games.
|
|||||||||||||||
| A few 3d chat servers |
OK. We knew a litlle VRML, but where are the games ? Well, the games are in Multi-User Worlds and in multi-user-worlds . |
|||||||||||||||
| A forum about Opensim UAb |
Use this forum to interact about Opensim UAb More info/help about Opensim UAb on Main Menu, here |
|||||||||||||||
| A handy Window for media an other content in babelx3d Worlds |
Hi all, This came up from the need to tell digital stories in 3D worlds. A few issues have to be addressed in babelx3d interface and easy video is of course one of them. Video inside 3D is often problematic (can even crash the app) so there is a new HTML window available as an alternative to exibit these types of 2D media more easily and with less problems in a handy 2D window.
See a demo of this window's use with several types of files: How is it done?
Although intended primarily for YouTube alike media files, encapsulated with their own player, we can use any media files in this window if embedded in a html page, as seen in the demo. Image and text files, obviously too. I could not resist to test it with other file types besides video Please note that beyond each player specific controls, the window has a line below with tiny additional resize window and close icons. This is not a proprietary solution only usable in babelx3d/abnet worlds. In case the vrml scene is viewed in standalone, the video will open in a new standard browser window. For more details please look inside the vrml code or at this vivaty .fxw source demo file: http://www.odisseia.univ-ab.pt/ABNet2/demos/linktests/videolinktests.zip Hope you enjoy playing with this handy window. vcard |
|||||||||||||||
| A Head's Journey Into My Desk |
About 60 km beyond Lisbon, Óbidos is a popular tourist attraction. Visitors are enchanted by this well preserved medieval village, with quaint white-walled houses enclosed inside a castle. Most of them don't stray beyond the main street (actually, the portuguese name means straight street) with its cafes, beverages, souvenir and bric a brac stores and bookstores. Óbidos plans to be the portuguese version of Hay on Wye, a bookish village, and has a lot of bookstores and an ambitious literary festival. But the best delights of this village can be found only by straying from the main path. Exploring the medieval alleyways reveals fascinating and very photographable architectural details.
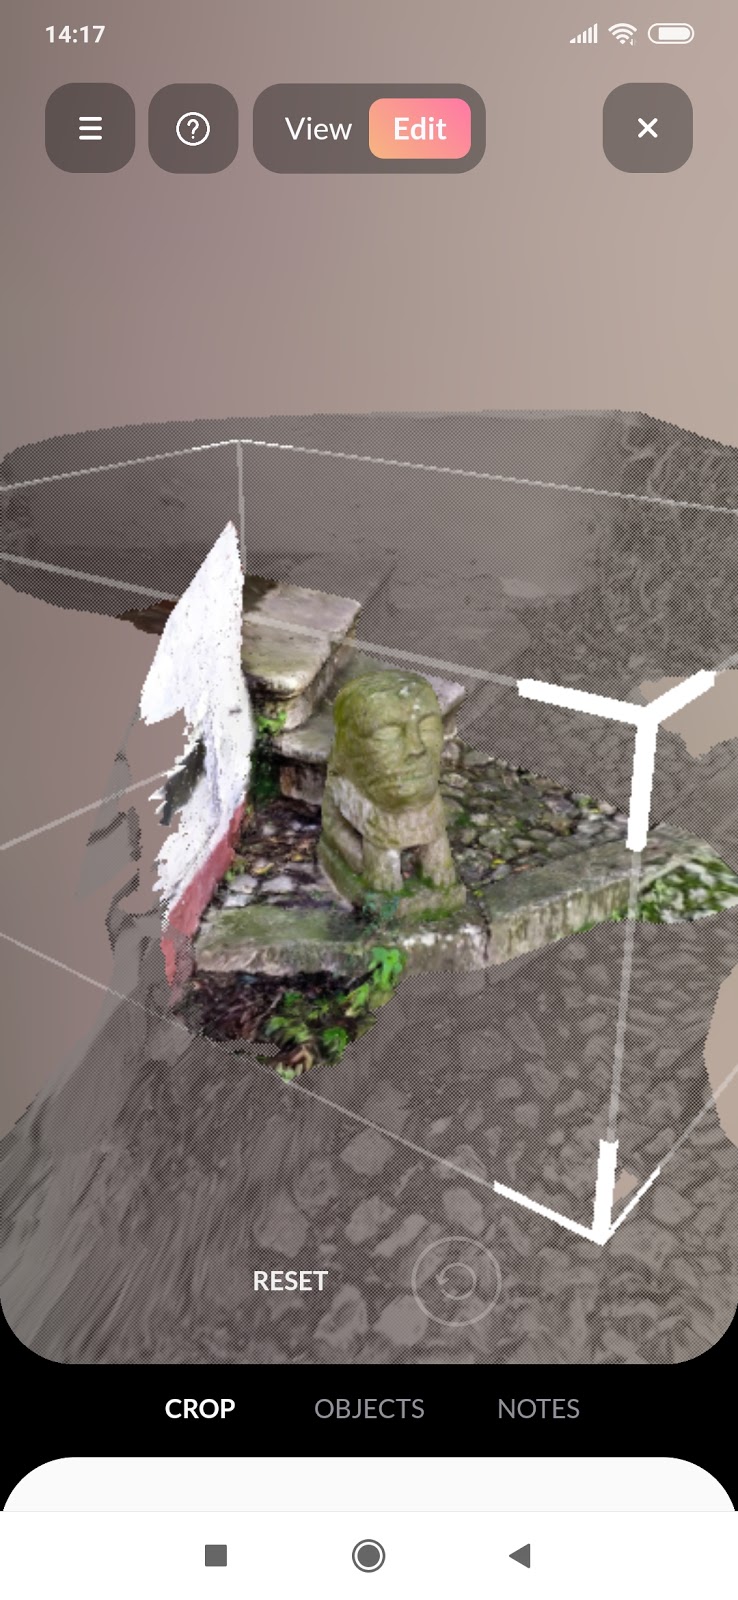
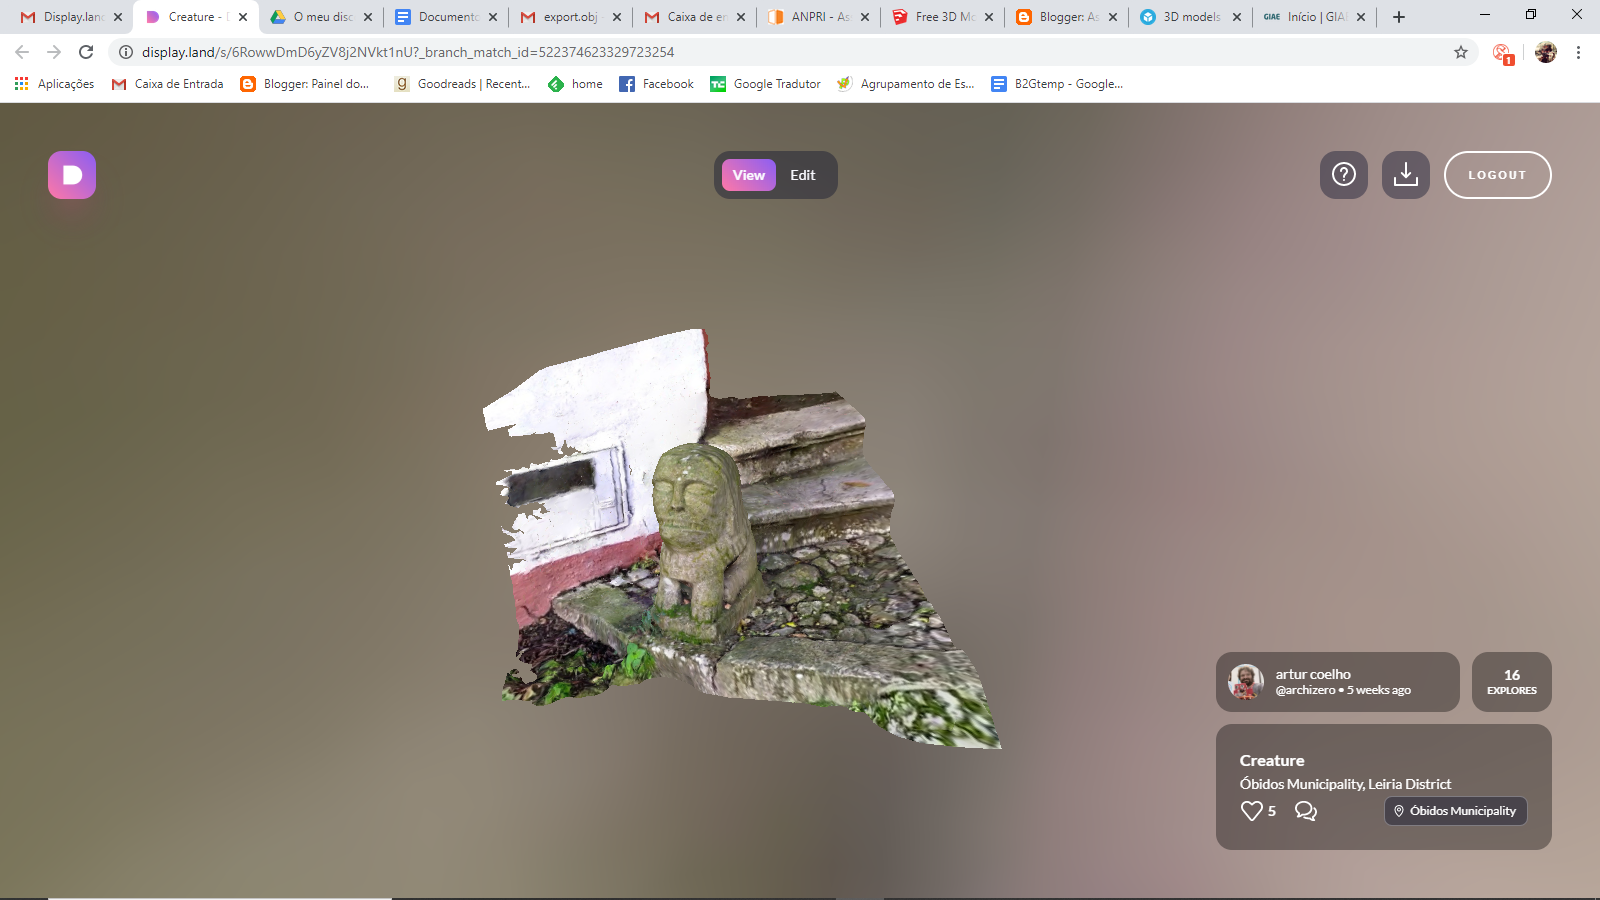
Criatura medieva by Artur Coelho on Sketchfab One that continuously attracts my eyes is this strange creature. It sits, like a guarding dog, at the entrance steps of an old house. I don't know how old it is. Looks very weathered, ancient and not the fake old sometimes found on these sort of places. I also don't know what creature it is. My mythology fails me. Doesn't look like a dog, dragon, lion, chimaera or any other medievalesque inspiration. The most salient feature is its large head, with a human like face. I'm fascinated by this sculpture, and during one of my visits to the bookshops in Óbidos, I thought, why can't I have this in my desk, looking at me while I work? And with 3d scanning and printing, this is easy to do.
First thing is scanning the statue. Scanning from photographs is a tricky but powerful technique, that requires computers far more powerful than my old laptop. But today, there are some mobile apps that bring photogrammetry into mobile devices. Display.land is one of the most recent, and actually quite powerful. Runs on middle to top range Android phones, and it's very easy to use for 3D scanning. From my experience, results are better with human-scale subjects: statutes, environments, architectural details, people and objects, or building facades. Small objects don't give good results.
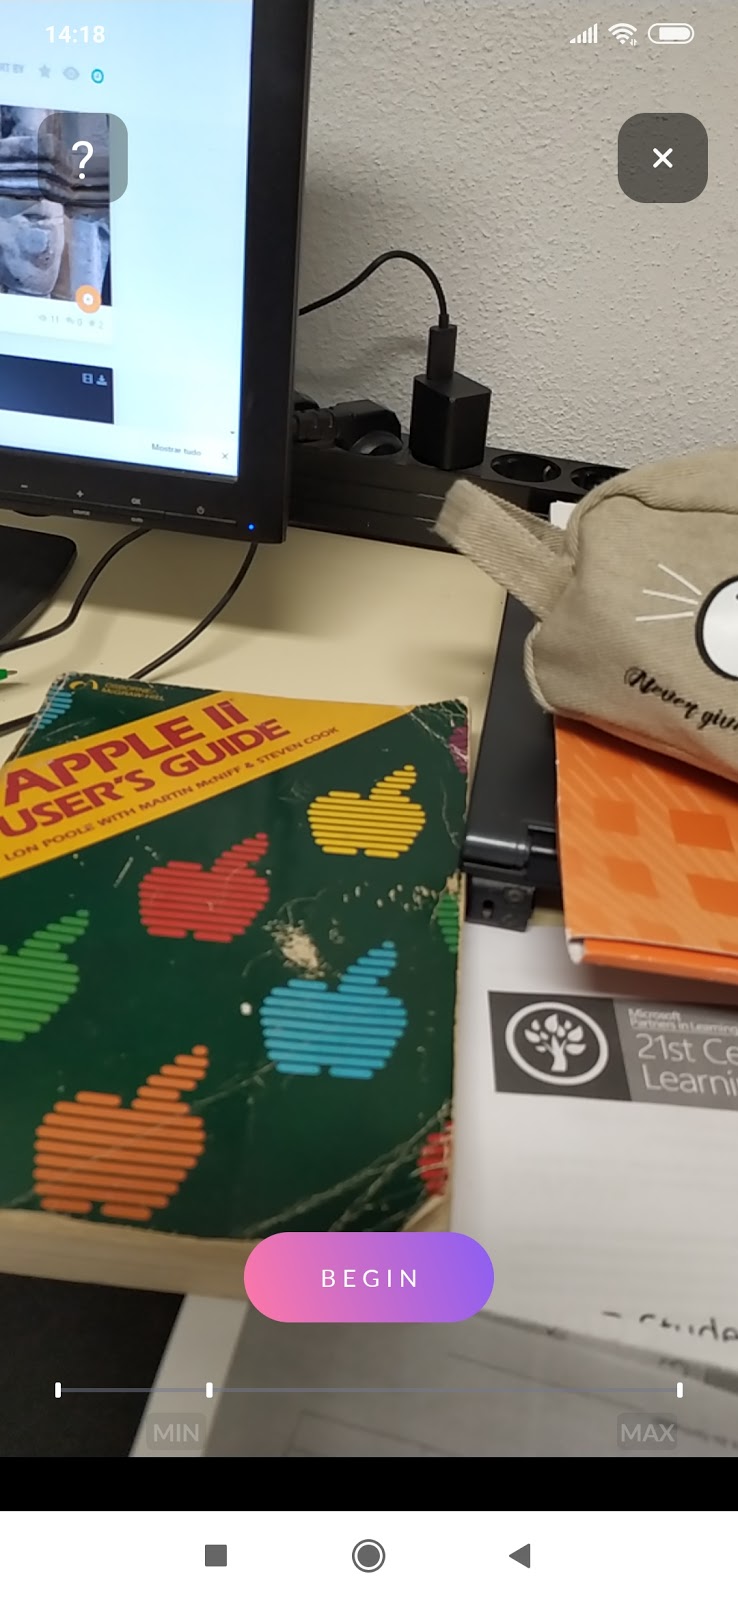
So, onwards. With my mid-range mobile, and a data connection, I start to scan this object. The trick is to capture multiple points of view that give the algorithm an idea of the shape of the objects. There are several ways to do it, my favorite is to walk around the object several times, in a spiral path, from bottom to top, circling several times. Display.land uses video for photogrammetry, but the capture is triggered by motion, not time. Point the camera and letting it run won't capture anything. You have to move around. The algorithm doesn't actually use video. It extracts images, and concatenates them with sensor data from the mobile phone (GPS, and location sensors, I assume, since the specific ways this app works are proprietary). The app has a progress bar, that shows us when the minimal amount of data has been captured for the algorithm. In most scans, this is enough for a reliable capture.
After capture, title and location have to be added, and the data uploaded to Ubiquity6’s servers. I generally wait for wifi access for this. After processing, captures can be further edited before publishing. Display.land has some limited editing capabilities in the mobile devices. Cropping is essential, since captures seldom return only what was scanned, and we need to discard extra geometry and center into the scan. This crop ensures that scans can be attractive in the app. But it's not destructive, all the captured mesh remains after cropping. 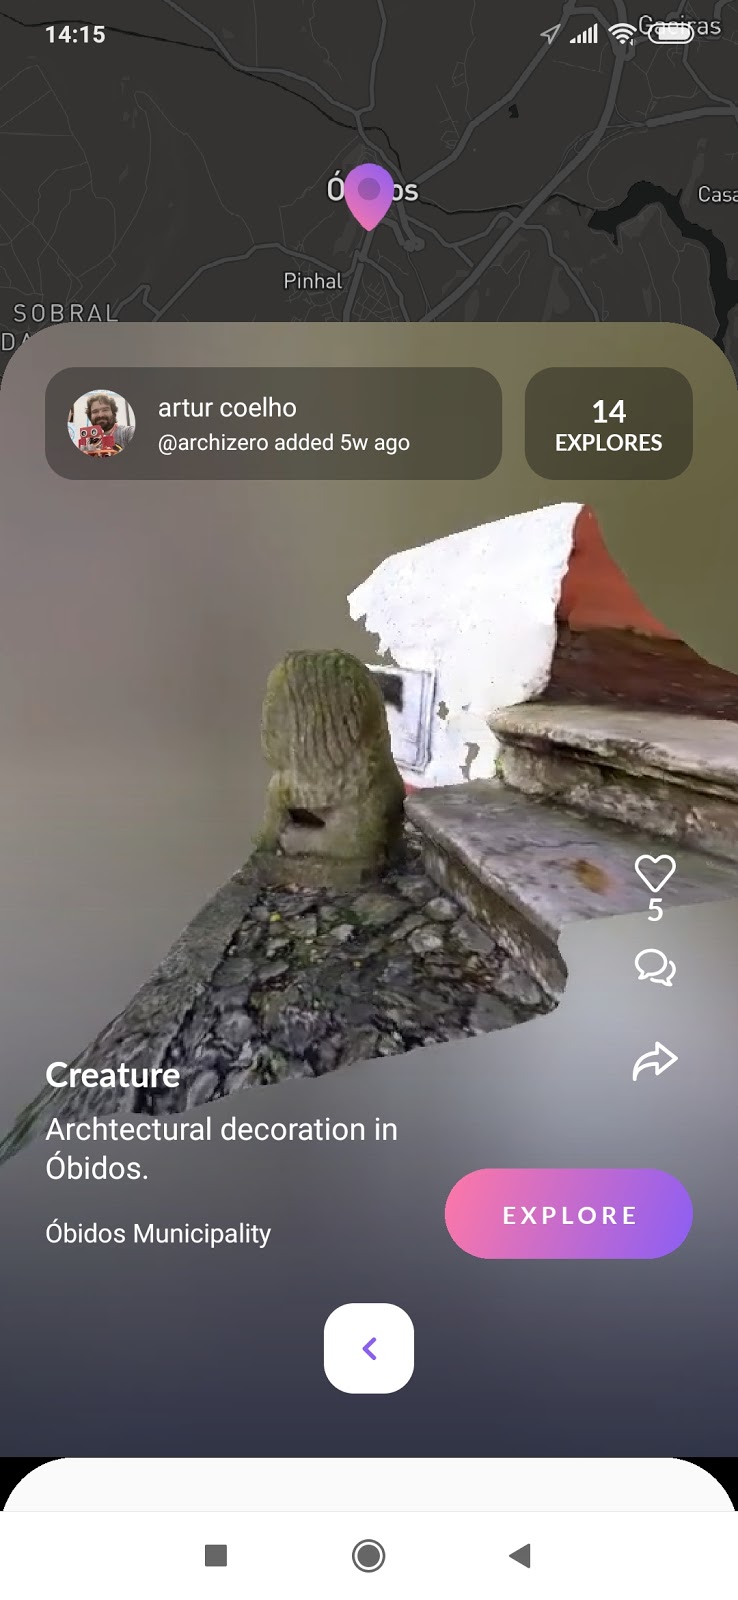  The next step is downloading the capture and process it for 3D printing. For now, this can't be done on Android phones. The trick is, on Display.land app, share the capture with yourself using email.
This generates a link. Access it in a browser, login to your Display.land account, and download your capture as an obj file.
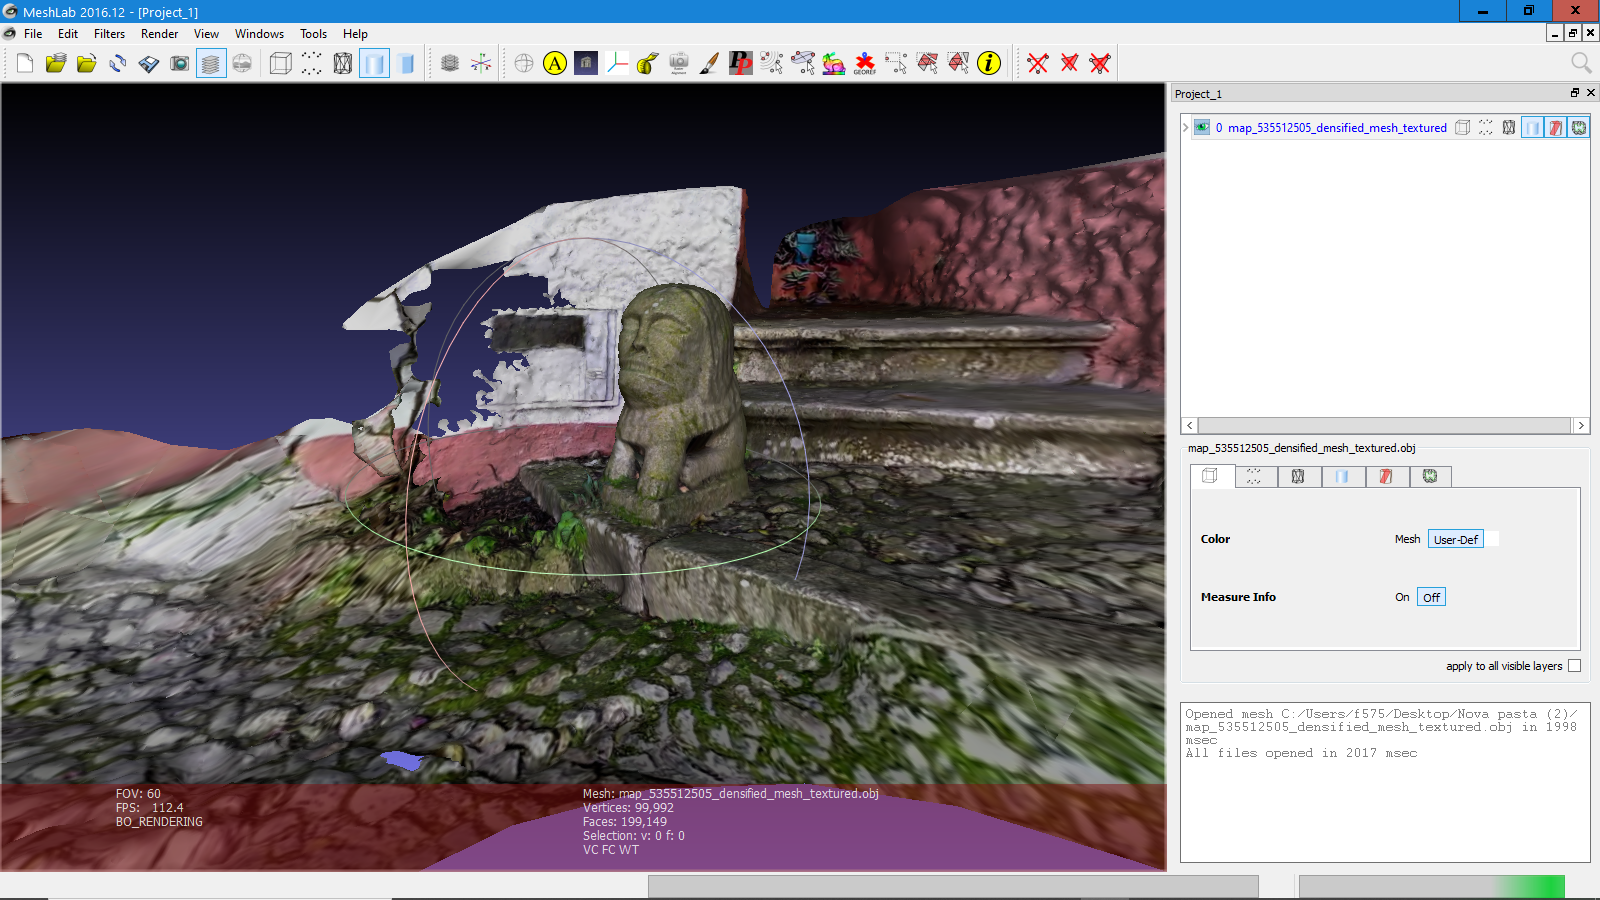
Next, we have to clean the mesh of unnecessary geometry. Display.land does an amazing work on scanning, but results can sometimes be rather baffling. Essentially, it returns us far more than just the scanned object. For this, I import the obj into Meshlab, and use its selection tools (adjacent and rectangular) to delete unnecessary shapes and triangles. Sometimes one by one, in small details. After finishing, just export the obj file. Meshlab will remap the textures. This is useful if you are processing captures to use in Unity or other 3D programs, but for 3D printing isn't necessary.
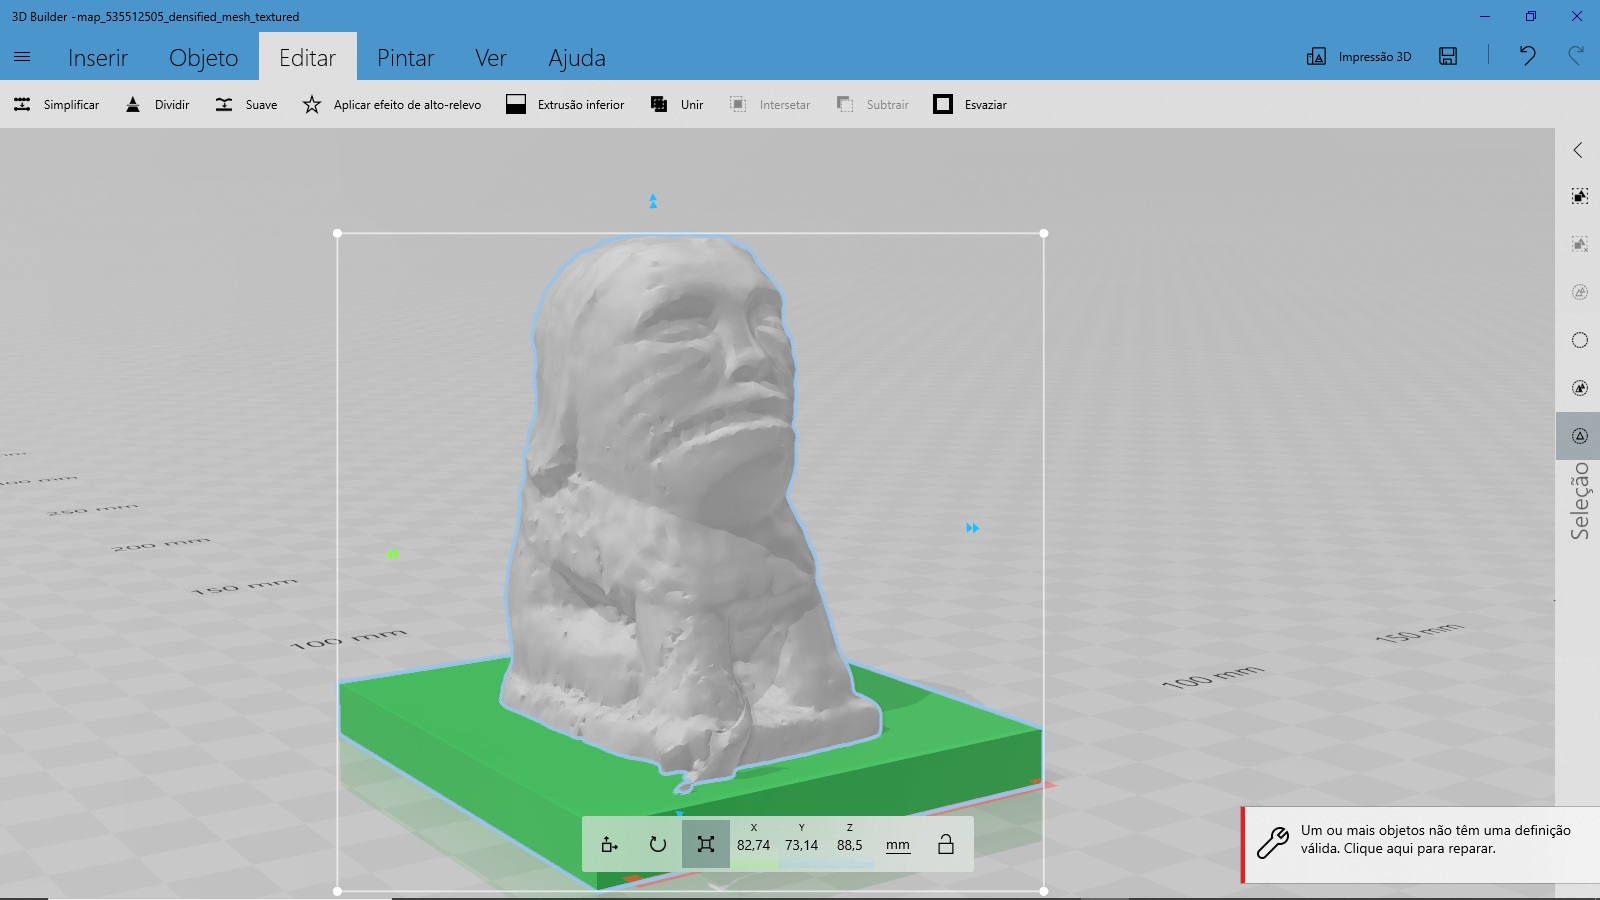
Before sending it to the printer, we have to make the model watertight. Meshlab leaves it with holes. There are several easy ways to do this. If the model has an area that can be used as a base, just import it into netfabb and use the planar cut tools to cut the model. Netfabb automatically seals the cuts in the mesh. To ensure that the model is error free (I strongly counsel this step for any 3D printing project, unless you like risk wasting time and filament), just run netfabb correction tools. When finished, export it as an STL file.
If the model needs a base, just open it using 3D Builder, a discrete yet surprisingly powerful windows tool (comes with 8 and 10 OS). Ignore the error detection warning, rotate, scale and position the mesh at will, and combine it with a deformed cube. Then export it as an STL file. Load the STL into your slicer, load filament into your printer, and after a few hours, the slice of reality captured using Display.land becomes tangible again. During this process, you have also gained some insight into how this service generates 3D models. What looks eerily detailed on screen is, in most models, an amazing stitching job to generate the texture map. If you look at the mesh without textures, you'll see that the capture has far less detail than what you saw on the screen. 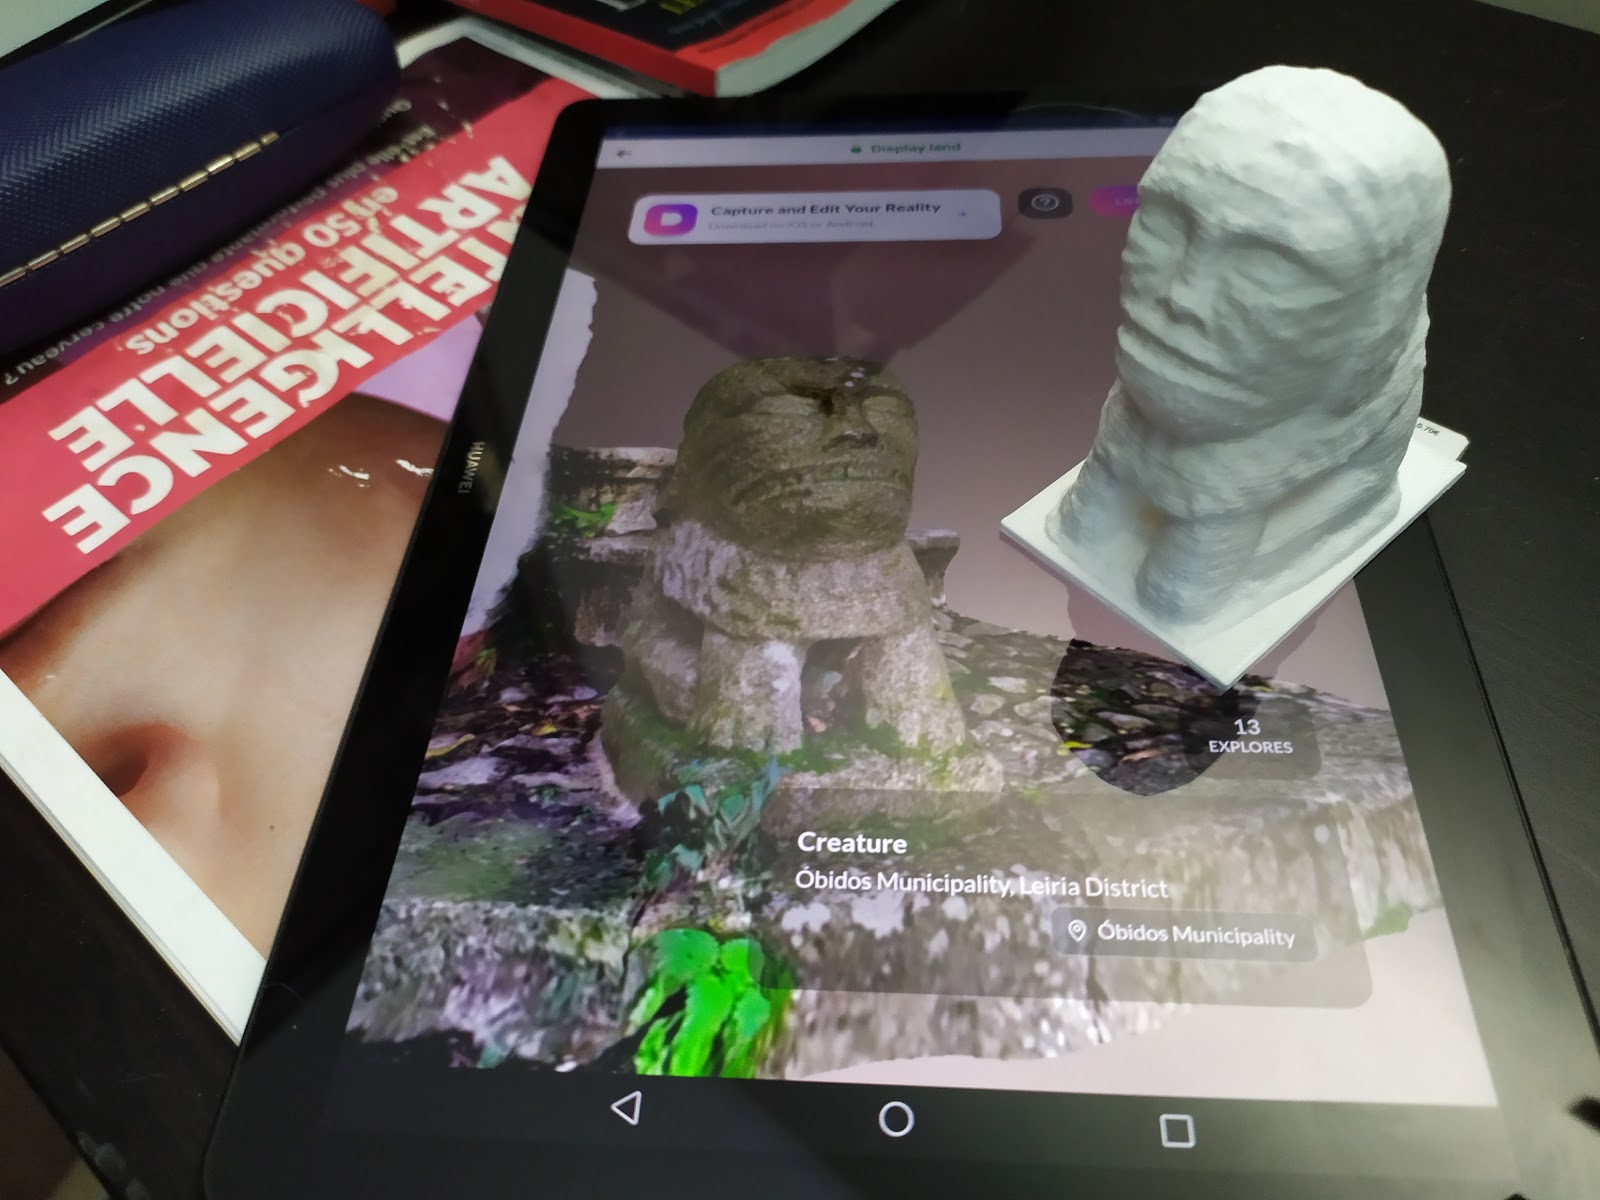 And, there is is. The strange creature in the doorstep is now sitting at my desk, staring at me while I work. It's actually a bit creepy, come to think of it. |
|||||||||||||||
| A list of active Google Plus communities related to OpenSim and the hypergrid |
Hypergrid Business maintains a updated list of active Google Plus communities related to OpenSim and the hypergrid. In this article, we can find this months 15 largest communities and the full list. |
|||||||||||||||
| A player Flying Kit for Unity |
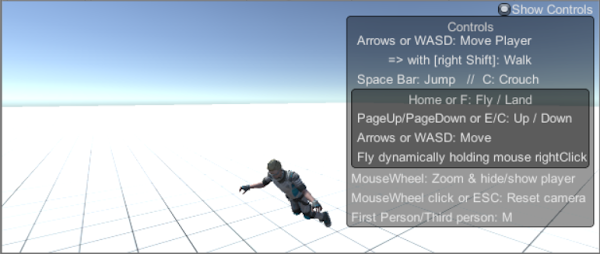
Hi all, As posted before in BabelX3d forum: Avatars that fly are important for Virtual World creators and users but Unity, out of the box, only provides walking avatar scripts and prefabs. With fly we can explore and enjoy virtual worlds in so many ways that a mere walking avatar is unable to provide. So, we have been working on a basic Fly Mode Kit to complement Unity's third person controller and add flying to your virtual world projects.BabelXplayerFlyKit is out now. Download it from our UnityPackages public folder and install the usual way on your unity project. FeaturesBabelXplayerFlyKit includes 3 core functionalities: flying, camera rotator and camera zoom. Although in different degrees of implementation, these features are common in classical virtual world systems (OpenSim, VRML/X3D, ...).and users/creators appreciate them. In BabelXplayerFlyKit the features are implemented in three core scripts that work independently:
Since these scripts work independently, their features can be used simultaneously or not by enabling or disabling the correspondent script. Example: if you want flying but do not like mouse rotator simply disable (or remove) MouseRotatorRightButtonX.cs and vice-versa. Installation and UseAdding a fly feature to your project is extremely simplified with the use of prefabs. After downloading and installing the kit package, a “BabelXplayerFlyKit” folder appears under Assets in unity’s project window. Then,
NavigationSome effort has been put here in order to have, as much as possible, "standard keys and controls" (arrows, wasd, ...) used in Opensim and other virtual world systems. Demos & supportA scene demo is included in the kit to test features and check configuration details. Get more detailed installation and using details in BabelXplayerFlyKit - quick start tutorial, included in the kit and also available in our packages public folder. Other demos, support and more on the forum: http://portal.babelx3d.net/content/flying-avatars-unity
Include flying in your 3D worlds and enjoy them in a new way! vcard |
|||||||||||||||
| A Taxonomy of VR Platforms |
Genesis first, then classification; this is the design pattern for new productions. After seeing current efforts, we realize that writers are struggling to create a virtual reality platform taxonomy and are not reaching a satisfying conclusion. Thus, we present a taxonomy that suits our own priorities of accessibility, immersion, and functionality. Plus it is in 3D. And includes Special Quadrants. Because we’re cool that way. Written together with Heather Dodds #taxonomy #accessibility #immersion #functionality #virtualreality #VR #classification #AltspaceVR #MozillaHubs #FrameVR #SomniumSpace #ENGAGE #rumii #VirBELA #RecRoom #iSeeVC #Sansar #NeosVR #JanusXR #VESTAJanusXR #Anyland #cryptovoxels #sinespace #universaldesign
|
|||||||||||||||
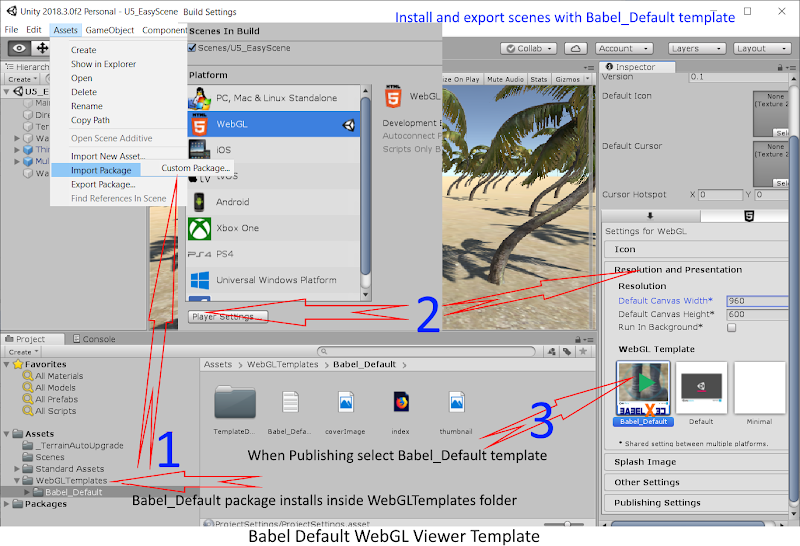
| A Video Style Viewer for WebGL Scenes |
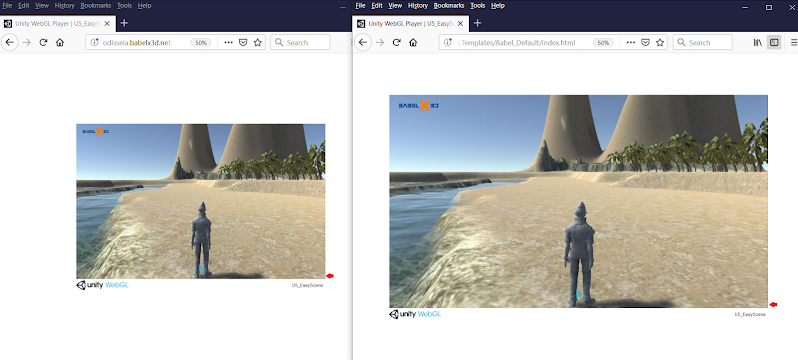
Unity's default WebGL template is handy but has some shortcomings:
We made previous attempts tho overcome this by tweaking the splash screen but a better idea come out inspired by video's way: play button and cover image. A video style play button brings the option to proceed or not with the loading and the usual associated cover image to publicize the scene theme is also a plus. This was our starting motivation for Babel Default WebGL template.
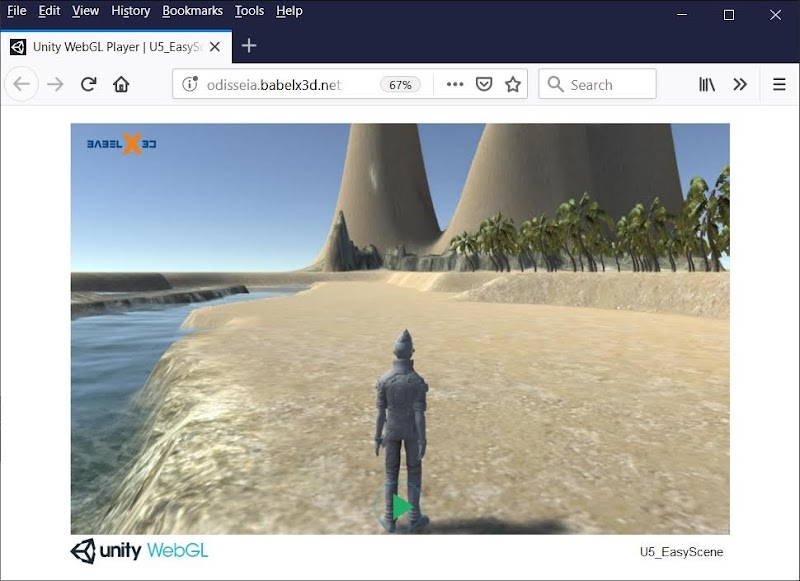
Demo: http://odisseia.babelx3d.net/Unity3DTests/WebGLTemplates/Babel_Default/index.html 1. Features
URL command details Notice that by design this URL command shows the Cover Image for a little bit, 3 seconds, and then proceeds loading the scene. The wait time can also be defined by using in the URL command a value in milliseconds instead of the yes argument. Examples: with "?start=5000" the wait is 5 seconds; with "?start=0" there is no wait and the scene is loaded immediately without showing the Cover Image: WebGL Window resizing
Besides the enhancements we tried to keep the publishing page with the overall Unity's look, familiar to users. The play button is located at bottom and has a soft tone in order to interfere as less as possible with the cover image view. 2. Installation and useThe package is available in our BabelX3D packages public folder. (current version v1.1)
To install, as seen in Figure 3 above:
To use:
3. Discussion and support on BabelX3D forumhttps://portal.babelx3d.net/content/add-play-button-and-cover-image-webgl-launch Enjoy! vcard |